InSitu stap voor stap: van een leeg scherm tot een ondertekend document, op iPhone, iPad en Mac.
Mode d’emploi
InSitu pas à pas : de l’écran vide au document signé, sur iPhone, iPad et Mac.
User guide
InSitu step by step: from an empty screen to a signed document, on iPhone, iPad and Mac.
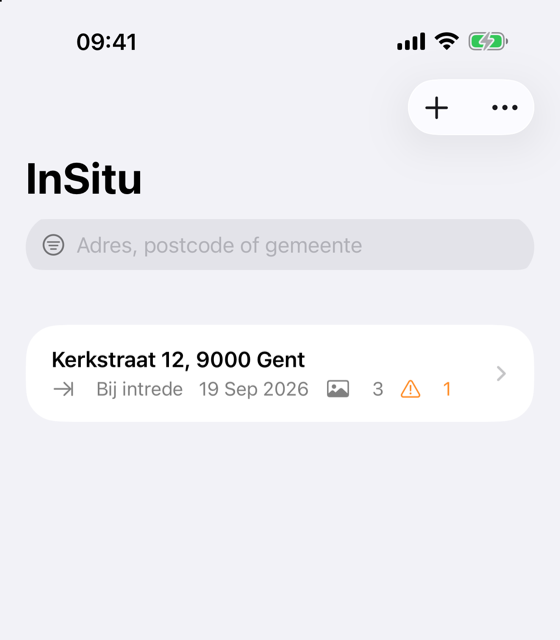
Eerst proberen? Tik in de lijst op … en kies Voorbeeldverslag toevoegen. Je krijgt een volledig ingevuld verslag waarin je alles kunt uitproberen, en dat je daarna gewoon verwijdert.
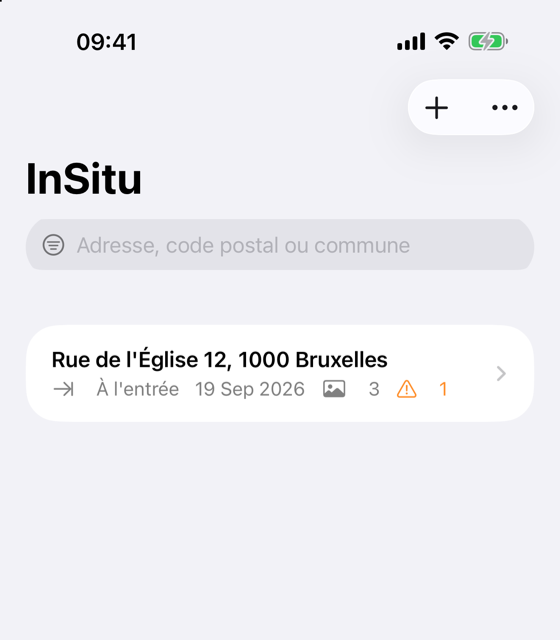
Tik op + en kies Plaatsbeschrijving huur of Fotoverslag. Het nieuwe verslag gaat meteen open.
Met het filterveld bovenaan zoek je op adres, postcode of gemeente. Meerdere woorden mogen; ze moeten allemaal voorkomen. De filter blijft staan tot je hem wist, en geldt alleen voor dit toestel.
Onder … kies je de taal van de app en de spreektaal (Nederlands, Frans of Engels).
Een verslag verwijderen: veeg de regel naar links.
2. Pand en partijen
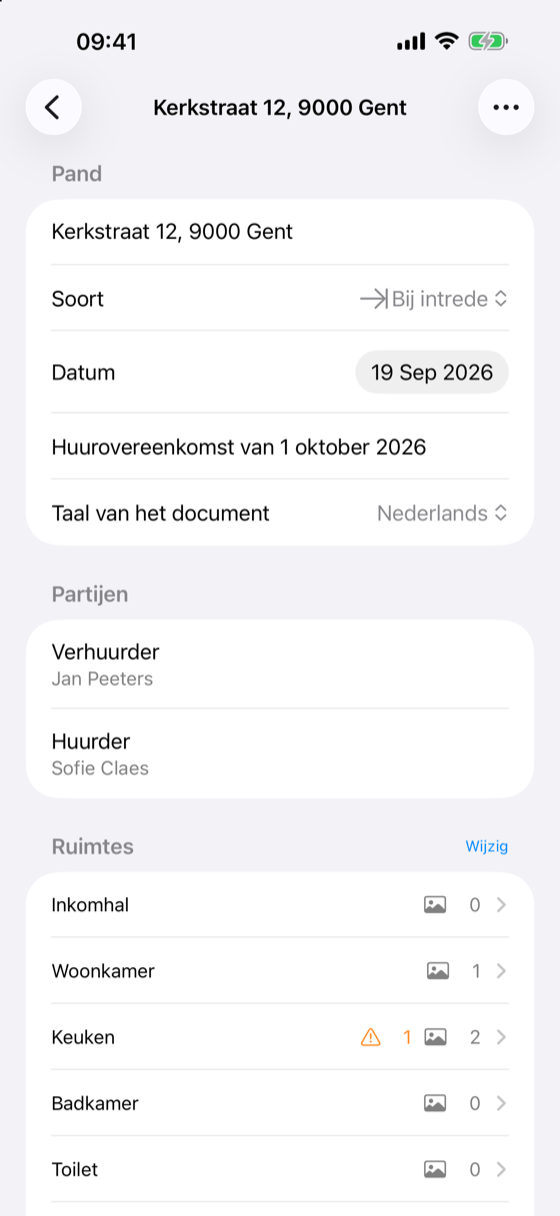
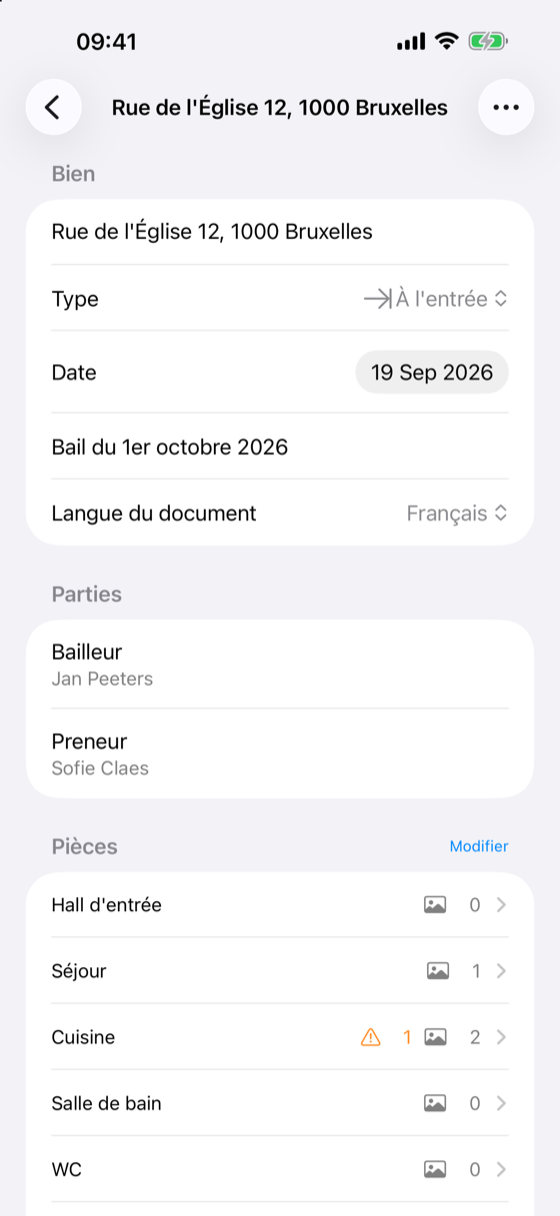
Vul het adres in, kies Bij intrede of Bij uittrede, de datum en de huurovereenkomst waar het verslag bij hoort.
De taal van het document staat los van de taal van de app. Zo maak je in een Nederlandstalige app een Frans document.
Tik op Verhuurder en Huurder voor naam en adres, en of ze aanwezig zijn of vertegenwoordigd worden.
3. Ruimtes en onderdelen
Woning aanmaken in één tik zet de gebruikelijke ruimtes klaar, elk met hun vaste onderdelen. Met Ruimte toevoegen maak je er zelf een bij; met Wijzig verander je de volgorde of verwijder je een ruimte.
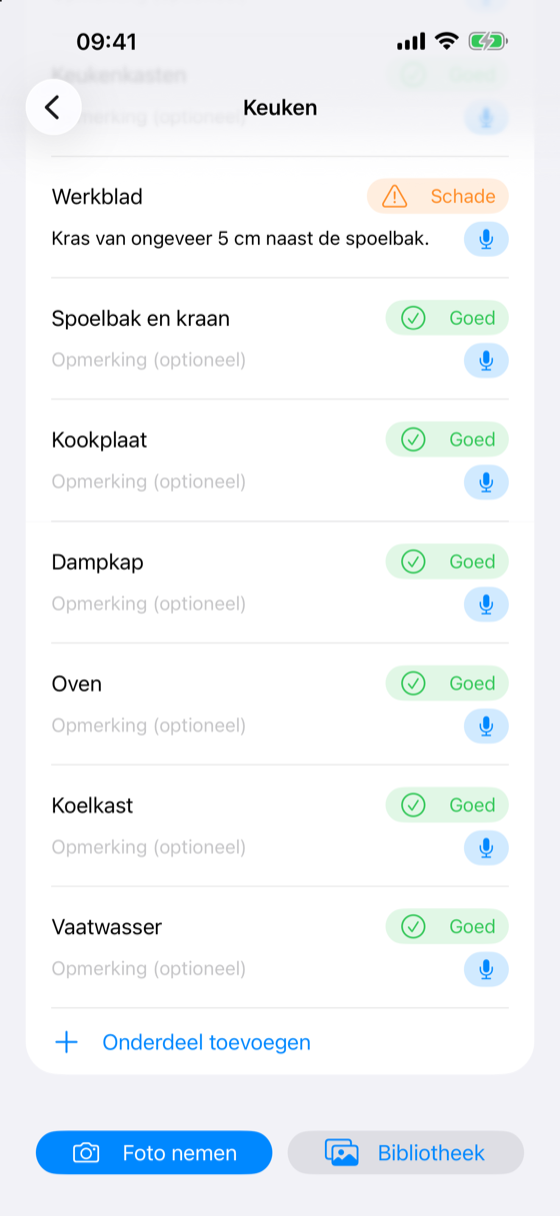
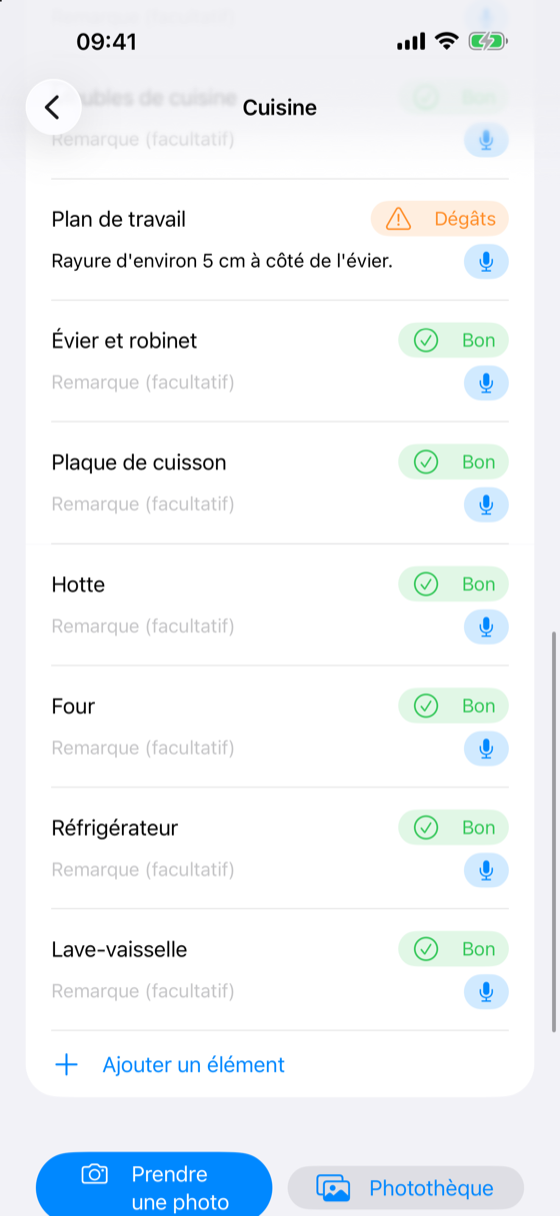
Elk onderdeel staat standaard op Goed. Je hoeft dus alleen aan te raken wat afwijkt: tik op de staat en kies Normale slijtage of Beschadigd.
Typ een opmerking, of tik op de microfoon naast het onderdeel en spreek ze in. Een tweede opname wordt achter de eerste gezet.
Bovenaan de ruimte is er plaats voor algemene vaststellingen. Onderaan voeg je een eigen onderdeel toe; een onderdeel verwijderen doe je door te vegen.
4. Foto’s
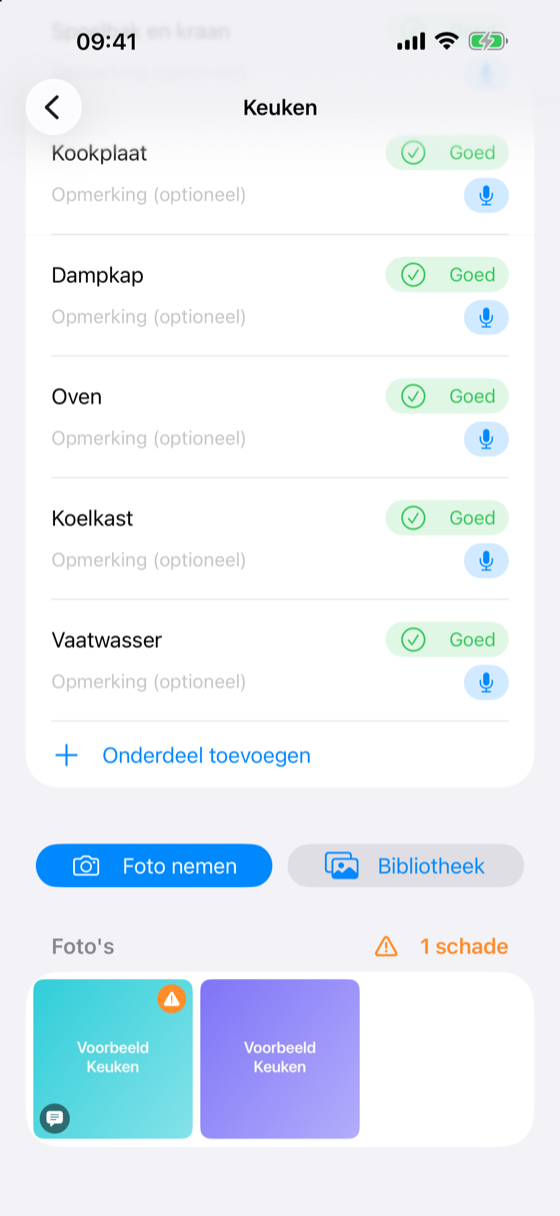
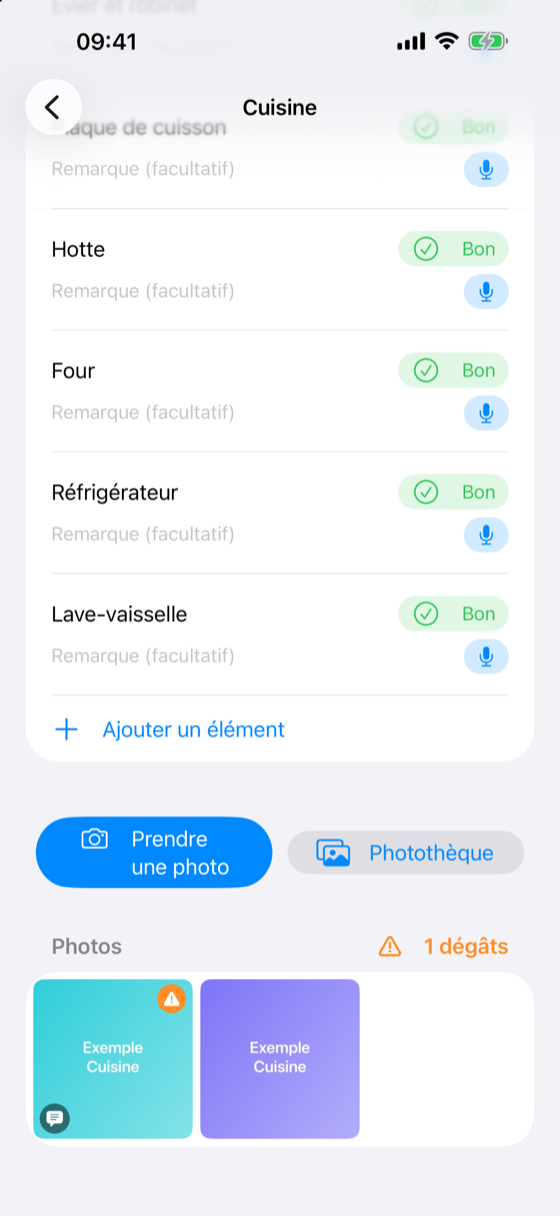
Onderaan elke ruimte: Foto nemen of Bibliotheek (tot 20 foto’s tegelijk). Liggend of staand maakt niet uit; de foto blijft in zijn oorspronkelijke richting.
Tik op een foto om ze als schade te markeren en er commentaar bij te typen of in te spreken. Je kunt ze daar ook vervangen of verwijderen.
In het document staan de foto’s bij hun ruimte, groot genoeg om details te zien, doorlopend genummerd en met datum en uur.
5. Inspreken
Inspreken kan bij de vaststellingen van een ruimte, bij elk onderdeel, bij foto’s en bij de algemene opmerkingen. Tik op de microfoon, spreek, en tik op Stop.
Je hoeft niet te wachten: de opname wordt op de achtergrond uitgeschreven en komt in het juiste veld terecht. Zonder bereik blijft ze bewaard en gebeurt het uitschrijven later.
De eerste keer vraagt iOS toestemming voor de microfoon en voor spraakherkenning. Geweigerd? Zet het aan via Instellingen → InSitu.
6. Meterstanden en sleutels
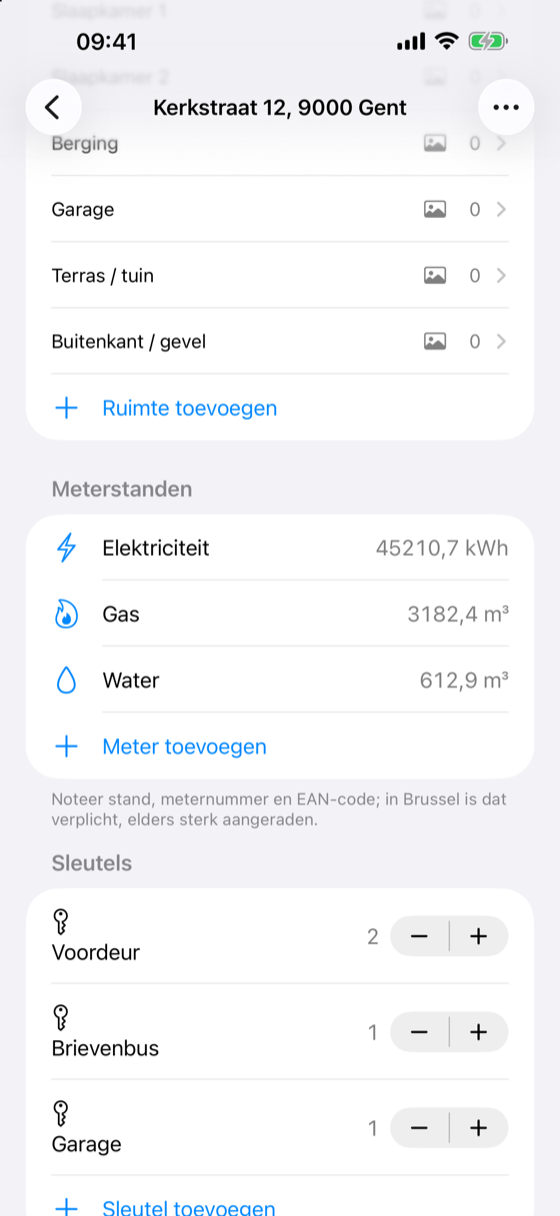
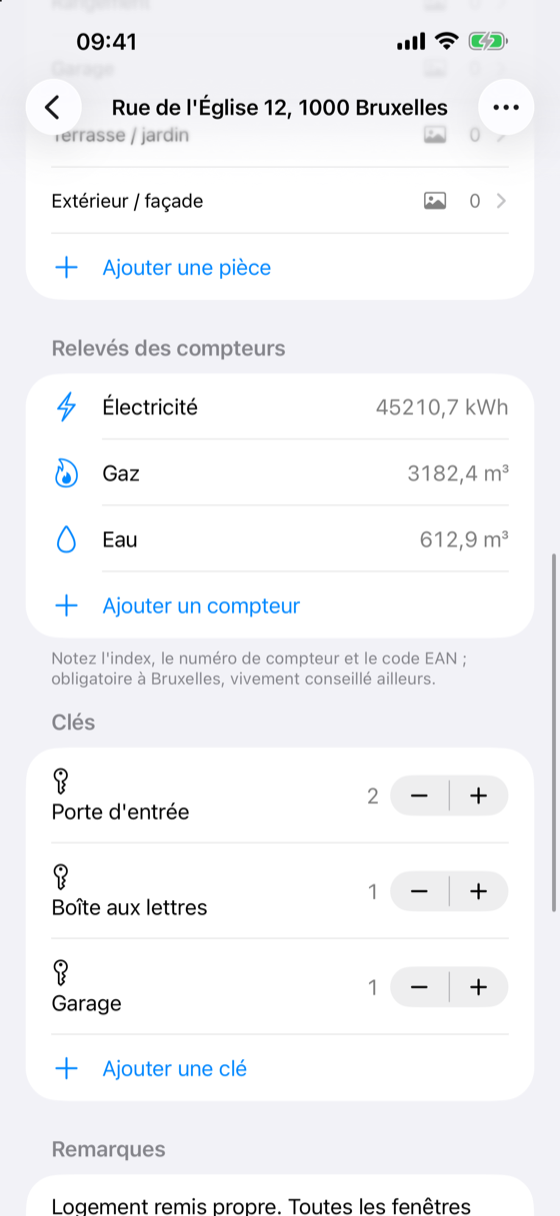
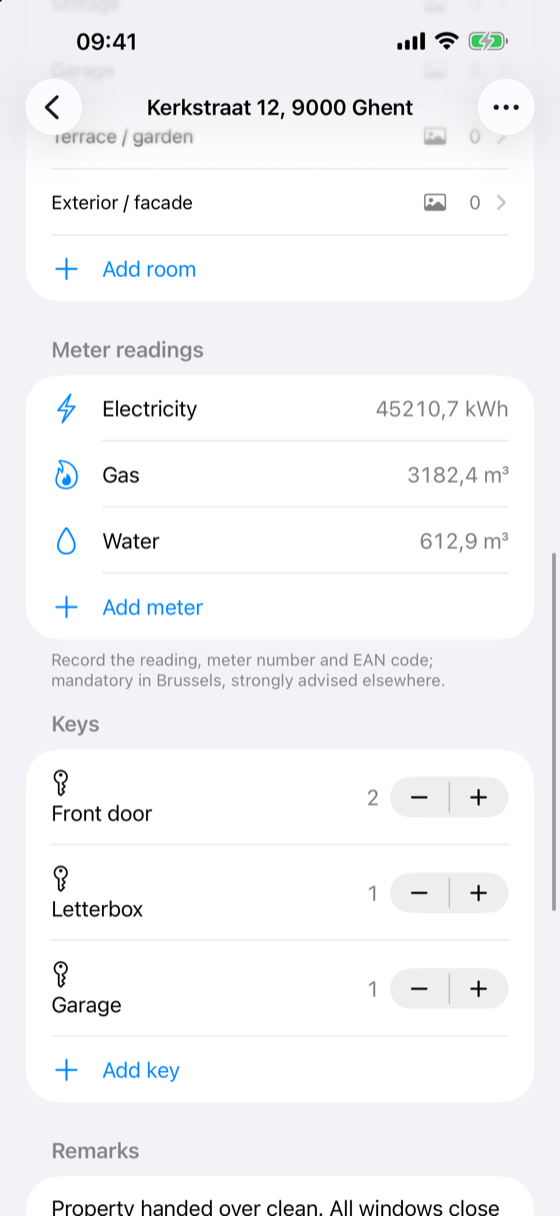
Meter toevoegen: elektriciteit (dag en nacht), gas, water, stookolie of een andere meter. Per meter noteer je de stand, het meternummer, de EAN-code, de datum van opname en eventueel een foto van de teller.
In Brussel zijn meternummer en EAN-code verplicht; elders zijn ze sterk aangeraden.
Sleutels: kies een soort of typ een eigen omschrijving, en stel het aantal in met − en +.
7. Ondertekenen en document maken
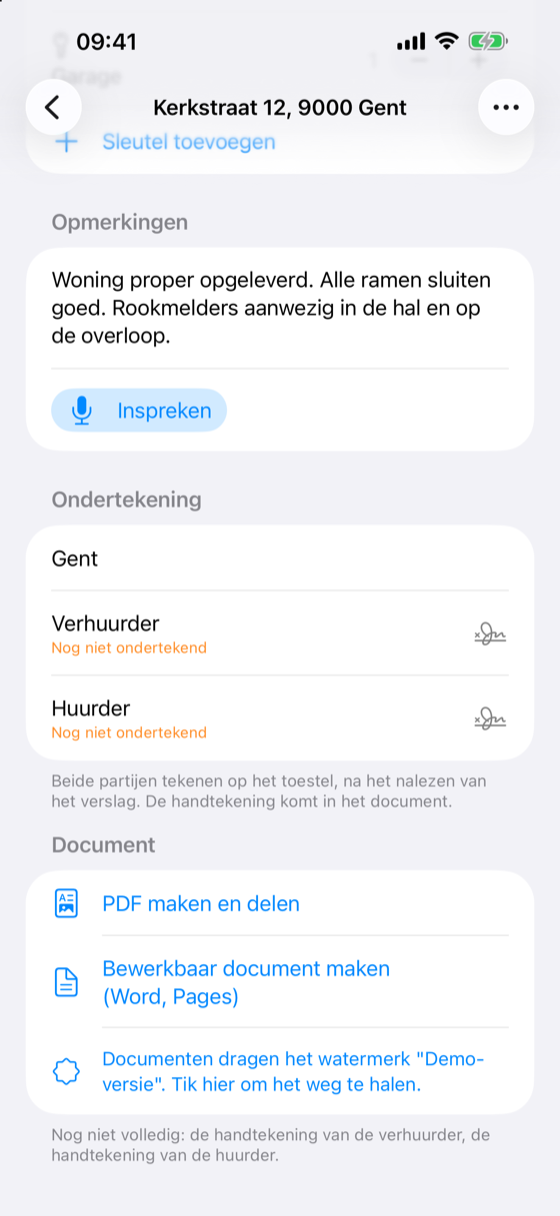
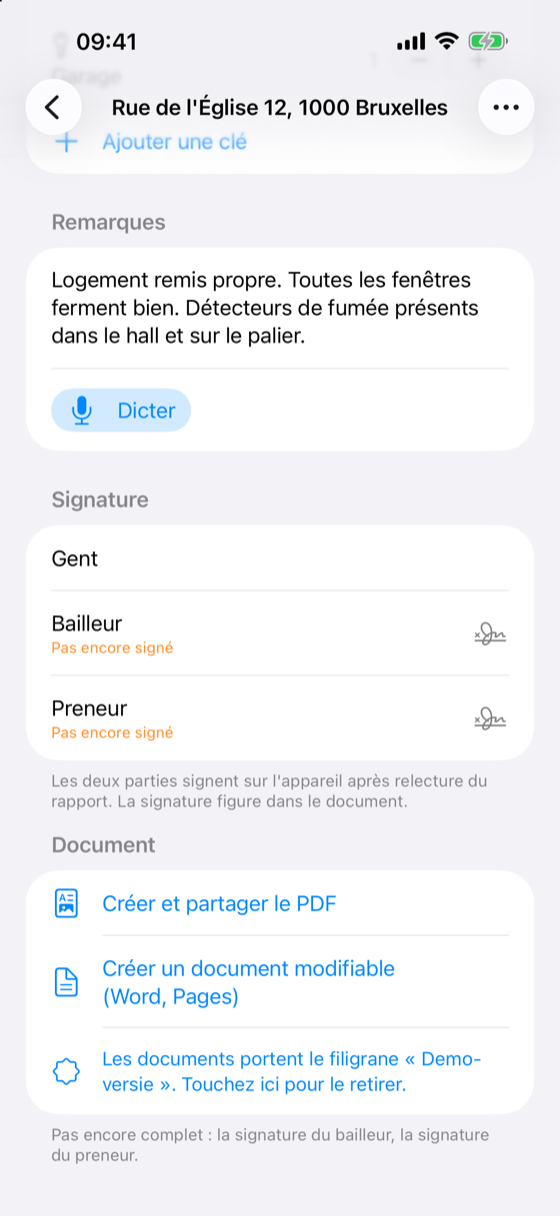
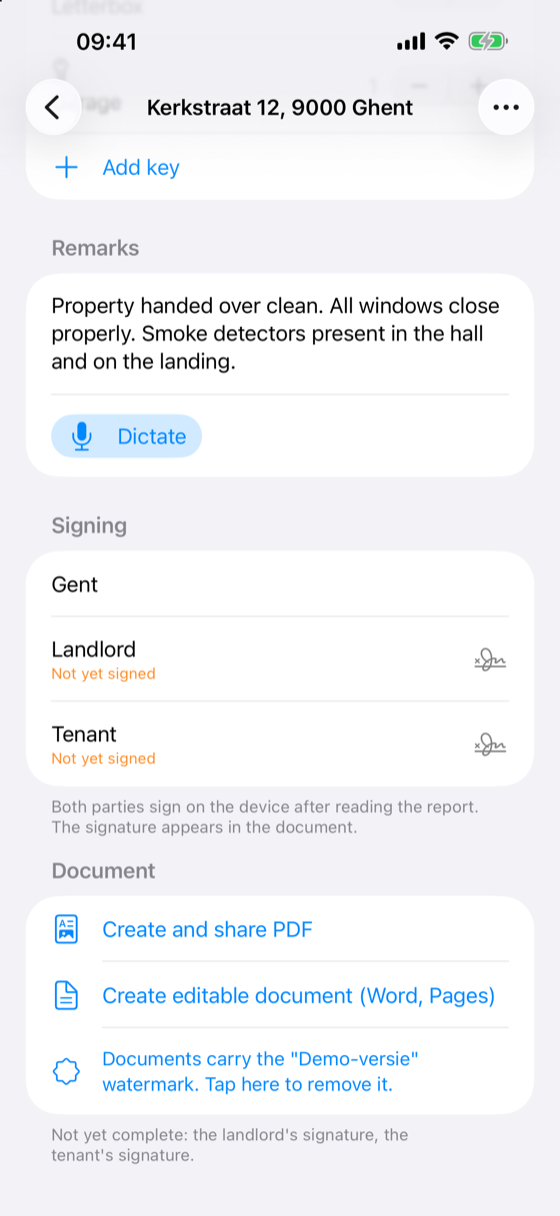
Vul de gemeente in en laat beide partijen tekenen op het toestel, met de vinger of de Apple Pencil. De handtekening komt in het document.
PDF maken en delen levert het document om bij de huurovereenkomst te voegen en te registreren. Bewerkbaar document maken (Word, Pages) geeft een werkversie die je opent in Microsoft Word of Apple Pages.
Ontbreekt er nog iets, dan zegt de app precies wat. Je kunt eerst aanvullen of toch een PDF maken, bijvoorbeeld als ontwerp.
Delen gebeurt via het gewone deelvenster: mail, AirDrop, Bestanden, afdrukken.
8. Wat er in het document staat
Pand, partijen, datum en de huurovereenkomst, daarna elke ruimte apart.
Alleen wat afwijkt komt in detail. Een ruimte waar alles goed is, krijgt “Geen opmerkingen – alles in goede staat.” Zijn er wel opmerkingen, dan staat er “Geen opmerkingen buiten:” met daaronder de onderdelen met slijtage, schade of een opmerking.
De foto’s van de ruimte volgen meteen daarna. Dan meterstanden, sleutels, algemene opmerkingen en de handtekeningen.
Onderaan elke pagina staan het volledige adres en de paginanummering (1/6, 2/6 …).
9. Uittrede op basis van de intrede
Open het verslag van de intrede, tik op … en kies Uittredende plaatsbeschrijving aanmaken.
Je krijgt dezelfde ruimtes en onderdelen, met naast elk onderdeel de staat bij intrede. Je past alleen aan wat veranderd is.
Het document bevat een tabel Verschillen met de intrede.
10. Fotoverslag (zonder huur)
Voor een vaststelling vóór werken bij de buren, lekdetectie, schade, een beschrijving voor de notaris, een oplevering of een beschrijving voor verkoop of verhuur.
Je kiest een aanleiding, werkt met zones in plaats van ruimtes en schrijft een samenvatting die bovenaan het document komt.
De betrokkenen tekenen voor gezien. Meterstanden en sleutels zet je alleen aan wanneer je ze nodig hebt.
11. iPhone, iPad en Mac
Je verslagen staan via iCloud op al je toestellen met hetzelfde Apple-account. Begin ter plaatse op je iPhone en werk af op je iPad of Mac.
Met veel foto’s kan de eerste synchronisatie enkele minuten duren. Zonder internet werk je gewoon verder; de rest volgt later.
InSitu werkt vanaf iOS 17, dus ook op oudere toestellen.
12. Zonder watermerk
InSitu is gratis en volledig te gebruiken. Elk document draagt dan het watermerk “Demo-versie”.
Tik in het deel Document op de regel over het watermerk om het met een eenmalige aankoop weg te halen. Geen abonnement; de aankoop geldt voor al je toestellen.
Nieuw toestel? Kies in hetzelfde venster Aankopen herstellen.
Envie d’essayer d’abord ? Dans la liste, touchez … puis Ajouter un rapport d’exemple. Vous obtenez un rapport complet pour tout tester, à supprimer ensuite.
Touchez + et choisissez État des lieux locatif ou Rapport photo. Le nouveau rapport s’ouvre aussitôt.
Le champ de filtre en haut cherche par adresse, code postal ou commune. Plusieurs mots sont permis ; ils doivent tous figurer. Le filtre reste actif jusqu’à ce que vous l’effaciez, et ne vaut que pour cet appareil.
Sous …, choisissez la langue de l’app et la langue de dictée (néerlandais, français ou anglais).
Supprimer un rapport : balayez la ligne vers la gauche.
2. Bien et parties
Indiquez l’adresse, choisissez À l’entrée ou À la sortie, la date et le bail auquel le rapport se rapporte.
La langue du document est indépendante de celle de l’app : vous pouvez créer un document en néerlandais depuis une app en français.
Touchez Bailleur et Preneur pour le nom et l’adresse, et pour indiquer s’ils sont présents ou représentés.
3. Pièces et éléments
Créer un logement en un geste prépare les pièces habituelles avec leurs éléments fixes. Ajouter une pièce en crée une autre ; Modifier permet de changer l’ordre ou de supprimer une pièce.
Chaque élément est par défaut sur Bon. Vous ne touchez donc qu’à ce qui s’en écarte : touchez l’état et choisissez Usure normale ou Endommagé.
Tapez une remarque, ou touchez le micro à côté de l’élément pour la dicter. Une deuxième dictée s’ajoute à la suite de la première.
En haut de la pièce, un champ accueille les constatations générales. En bas, vous ajoutez un élément ; pour en supprimer un, balayez-le.
4. Photos
Au bas de chaque pièce : Prendre une photo ou Photothèque (jusqu’à 20 photos à la fois). Paysage ou portrait, la photo garde son orientation d’origine.
Touchez une photo pour la marquer comme dégâts et y ajouter un commentaire, tapé ou dicté. Vous pouvez aussi la remplacer ou la supprimer.
Dans le document, les photos figurent auprès de leur pièce, assez grandes pour voir les détails, numérotées en continu, avec date et heure.
5. Dicter
La dictée est disponible pour les constatations d’une pièce, chaque élément, les photos et les remarques générales. Touchez le micro, parlez, puis touchez Stop.
Inutile d’attendre : l’enregistrement est transcrit en arrière-plan et arrive dans le bon champ. Sans réseau, il est conservé et transcrit plus tard.
La première fois, iOS demande l’accès au micro et à la reconnaissance vocale. Refusé ? Activez-le dans Réglages → InSitu.
6. Compteurs et clés
Ajouter un compteur : électricité (jour et nuit), gaz, eau, mazout ou autre. Pour chacun : l’index, le numéro de compteur, le code EAN, la date du relevé et éventuellement une photo du compteur.
À Bruxelles, le numéro de compteur et le code EAN sont obligatoires ; ailleurs, ils sont vivement conseillés.
Clés : choisissez un type ou tapez votre description, et réglez le nombre avec − et +.
7. Signer et créer le document
Indiquez la commune et faites signer les deux parties sur l’appareil, au doigt ou à l’Apple Pencil. La signature figure dans le document.
Créer et partager le PDF fournit le document à annexer au bail et à enregistrer. Créer un document modifiable (Word, Pages) donne une version de travail à ouvrir dans Microsoft Word ou Apple Pages.
S’il manque quelque chose, l’app vous dit précisément quoi. Vous pouvez compléter d’abord ou créer le PDF quand même, par exemple comme projet.
Le partage passe par la feuille de partage habituelle : e-mail, AirDrop, Fichiers, impression.
8. Ce que contient le document
Le bien, les parties, la date et le bail, puis chaque pièce séparément.
Seul ce qui s’écarte du bon état est détaillé. Une pièce où tout va bien porte « Pas de remarques – tout en bon état. » Sinon : « Pas de remarques sauf : », suivi des éléments avec usure, dégâts ou remarque.
Les photos de la pièce suivent aussitôt. Viennent ensuite les compteurs, les clés, les remarques générales et les signatures.
Au bas de chaque page : l’adresse complète et la pagination (1/6, 2/6 …).
9. La sortie sur la base de l’entrée
Ouvrez le rapport d’entrée, touchez … et choisissez Créer l’état des lieux de sortie.
Vous retrouvez les mêmes pièces et éléments, avec à côté de chacun l’état à l’entrée. Vous ne modifiez que ce qui a changé.
Le document contient un tableau Différences avec l’entrée.
10. Rapport photo (hors bail)
Pour un constat avant travaux chez les voisins, une détection de fuite, des dégâts, une description pour le notaire, une réception de travaux ou une description pour vente ou location.
Vous choisissez un motif, travaillez avec des zones au lieu de pièces et rédigez un résumé placé en tête du document.
Les personnes concernées signent pour vu. Compteurs et clés ne s’activent que si vous en avez besoin.
11. iPhone, iPad et Mac
Vos rapports vous suivent via iCloud sur tous vos appareils connectés au même compte Apple. Commencez sur place sur iPhone, terminez sur iPad ou Mac.
Avec beaucoup de photos, la première synchronisation peut prendre quelques minutes. Sans internet, vous continuez à travailler ; le reste suit plus tard.
InSitu fonctionne dès iOS 17, donc aussi sur des appareils plus anciens.
12. Sans filigrane
InSitu est gratuit et s’utilise entièrement. Chaque document porte alors le filigrane « Demo-versie ».
Dans la partie Document, touchez la ligne sur le filigrane pour le retirer par un achat unique. Pas d’abonnement ; l’achat vaut pour tous vos appareils.
Nouvel appareil ? Dans la même fenêtre, choisissez Restaurer les achats.
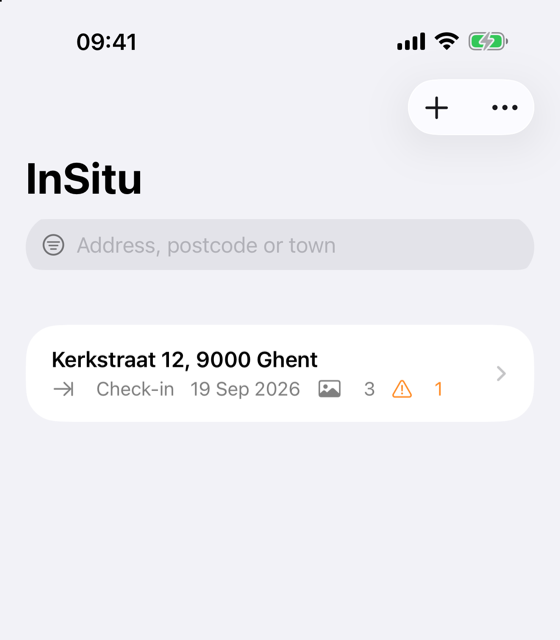
Want to try first? In the list, tap … and choose Add sample report. You get a fully completed report to try everything on, which you simply delete afterwards.
Tap + and choose Rental inspection report or Photo report. The new report opens straight away.
The filter field at the top searches by address, postcode or town. Several words are allowed; all of them must occur. The filter stays on until you clear it, and applies to this device only.
Under … you choose the app language and the dictation language (Dutch, French or English).
To delete a report, swipe its row to the left.
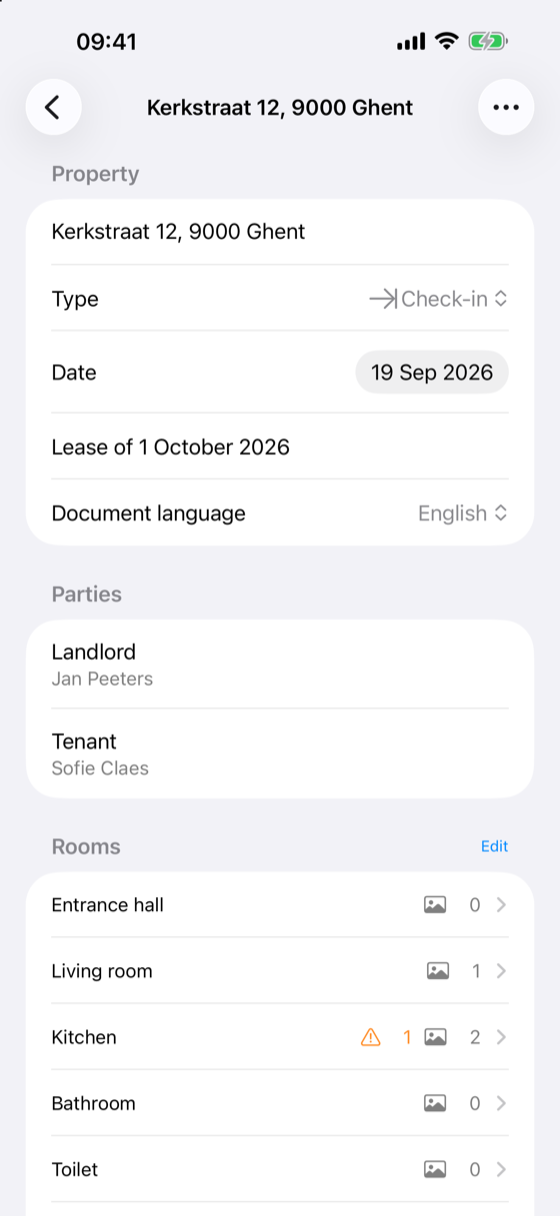
2. Property and parties
Enter the address, choose Check-in or Check-out, the date and the lease the report belongs to.
The document language is independent of the app language, so an English app can produce a French document.
Tap Landlord and Tenant for name and address, and whether they are present or represented.
3. Rooms and items
Create a home in one tap sets up the usual rooms with their standard items. Add room creates another; Edit lets you reorder or delete rooms.
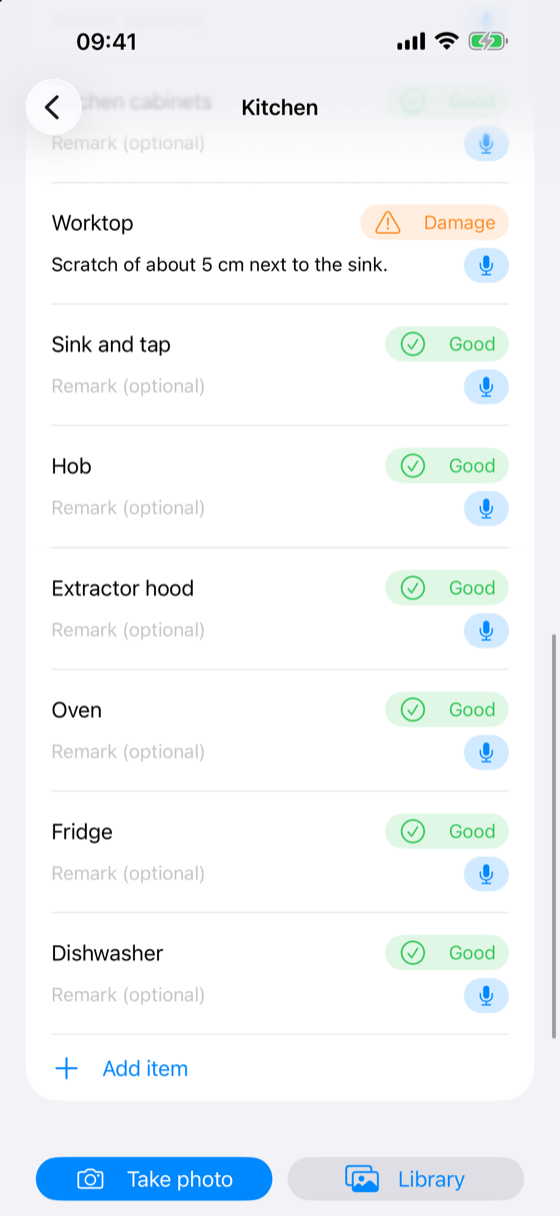
Every item starts as Good, so you only touch what differs: tap the condition and choose Normal wear or Damaged.
Type a remark, or tap the microphone next to the item and dictate it. A second recording is added after the first.
At the top of the room there is space for general observations. At the bottom you add your own item; swipe an item to delete it.
4. Photos
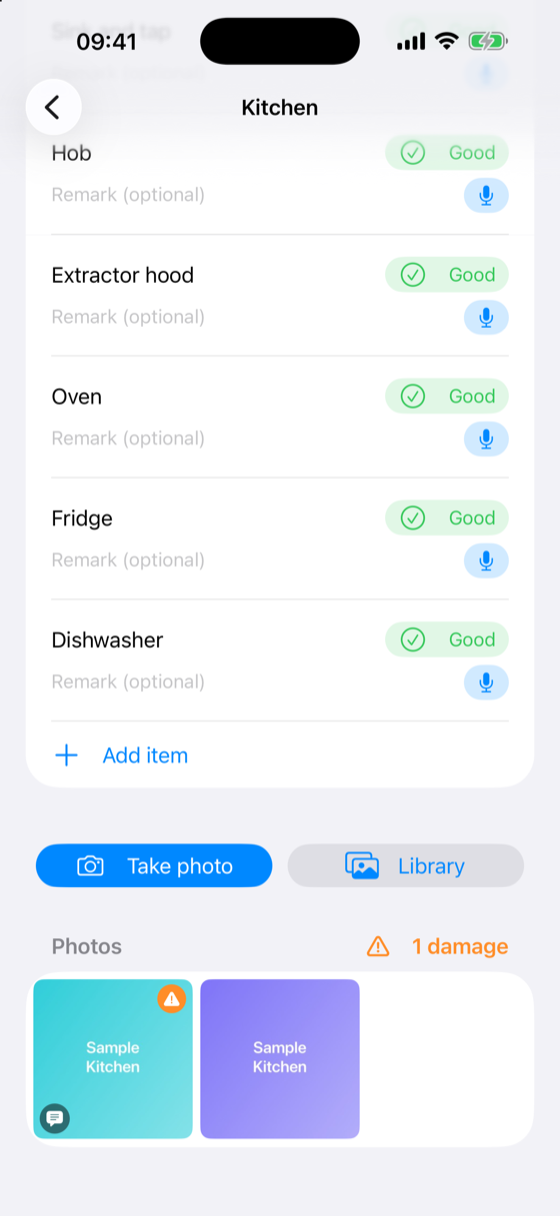
At the bottom of each room: Take photo or Library (up to 20 photos at once). Landscape or portrait, the photo keeps its original orientation.
Tap a photo to mark it as damage and add a comment, typed or dictated. You can also replace or delete it there.
In the document the photos appear with their room, large enough to see details, numbered consecutively, with date and time.
5. Dictation
Dictation is available for a room’s observations, every item, photos and the general remarks. Tap the microphone, speak, then tap Stop.
No need to wait: the recording is transcribed in the background and lands in the right field. Without a connection it is kept and transcribed later.
The first time, iOS asks permission for the microphone and speech recognition. Declined? Turn it on in Settings → InSitu.
6. Meter readings and keys
Add meter: electricity (day and night), gas, water, heating oil or another meter. For each one: the reading, meter number, EAN code, date read and optionally a photo of the meter.
In Brussels the meter number and EAN code are mandatory; elsewhere they are strongly advised.
Keys: choose a type or enter your own description, and set the number with − and +.
7. Signing and creating the document
Enter the town and have both parties sign on the device, by finger or Apple Pencil. The signature appears in the document.
Create and share PDF gives you the document to attach to the lease and register. Create editable document (Word, Pages) gives a working version that opens in Microsoft Word or Apple Pages.
If something is missing, the app tells you exactly what. You can complete it first or create the PDF anyway, for instance as a draft.
Sharing uses the standard share sheet: mail, AirDrop, Files, print.
8. What the document contains
Property, parties, date and lease, then each room separately.
Only what differs is detailed. A room where everything is fine reads “No remarks – everything in good condition.” Otherwise: “No remarks except:” followed by the items with wear, damage or a remark.
The room’s photos follow immediately. Then meter readings, keys, general remarks and the signatures.
At the foot of every page: the full address and page numbering (1/6, 2/6 …).
9. Check-out based on check-in
Open the check-in report, tap … and choose Create check-out report.
You get the same rooms and items, with the check-in condition next to each item. You only change what has changed.
The document includes a table Differences from check-in.
10. Photo report (no lease)
For a survey before works next door, leak detection, damage, a description for the notary, a handover of works or a description for sale or letting.
You choose a purpose, work with zones instead of rooms and write a summary that goes at the top of the document.
The persons involved sign as seen. Meter readings and keys are only switched on when you need them.
11. iPhone, iPad and Mac
Your reports follow you through iCloud on all devices signed in to the same Apple Account. Start on site on your iPhone, finish on your iPad or Mac.
With many photos the first sync can take a few minutes. Without internet you simply keep working; the rest follows later.
InSitu runs on iOS 17 and later, so on older devices too.
12. Without watermark
InSitu is free and fully usable. Every document then carries the “Demo-versie” watermark.
In the Document section, tap the line about the watermark to remove it with a one-time purchase. No subscription; the purchase covers all your devices.
New device? Choose Restore purchases in the same window.